Gage R&R is a method used in various industries to evaluate measurement systems. It involves examining the repeatability of measurements conducted by different operators and using various measuring devices. This analysis helps identify factors influencing measurement results and provides insights into improving accuracy and reliability.
The article below provides a detailed overview of the Gage R&R analysis process and practical applications of this method.
Gage R&R – Basic Concepts
The Gage R&R analysis aims to determine two factors: repeatability and reproducibility.
Repeatability of the Measuring System
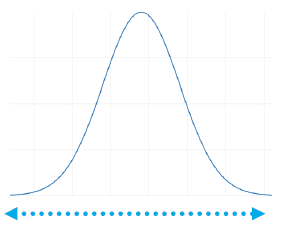
Repeatability refers to the variation between operators making multiple measurements of the same characteristic on multiple parts. It is an integral aspect of any measurement system.

Fig. 1. Graphical interpretation of repeatability
In addition, repeatability is defined as the variability occurring during measurements under the same conditions, like:
- operator
- setup
- parts
- environmental conditions
Reproducibility of the measuring system
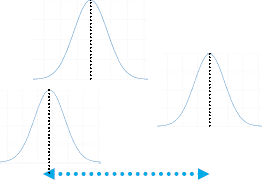
Reproducibility is the difference between the average of measurements made by different operators using the same measuring means and measuring the same characteristic.

Fig. 2. Graphical interpretation for reproducibility
It’s essential to remember that variability occurs when measurements are made by different people. The conditions that must be met are listed below:
- Various operators
- Same setup
- Same parts
- Constant environmental conditions
Process Variability
When dealing with the Gage R&R indicator, it’s crucial to understand the broader perspective resulting from Measurement System Analysis (MSA). Process variation divides into two areas: actual part-to-part variation and measurement variation. Gage R&R pertains to the latter.
Gage R&R calculated using the ANOVA method
In evaluating measurement systems, we use ANOVA (Analysis of Variance) as a statistical method to analyze the differences between measurement results obtained with different instruments or by different operators.

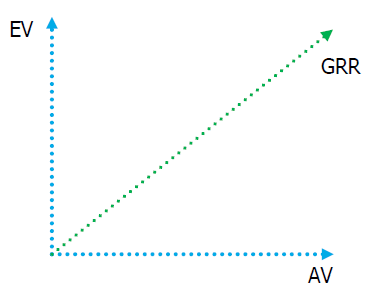
Fig. 3. Gage R&R Representation Including: EV Equipment Variability and AV Appraiser Variability
This method allows you to determine how much of the total variability in measurement results is due to differences between measurement systems and how much is due to other factors such as operators or measurement samples.
Thanks to this, it is possible to estimate the impact of individual factors on the measurement accuracy and improve the measurement system quality. Gage R&R analysis performed using this method typically involves:
- 3 operators
- 10 parts
- 3 measurements of each part by each operator
- Samples selected for the GRR study should represent at least 80% of the population variation.
Preparation for Gage R&R Analysis
The steps resulting from the preparation for this analysis can be classified as follows:
1. Select 10 parts (preferably covering the entire range of process variation), labeled if possible in a way that’s invisible to operators.
2. Designate three operators – they should have similar qualifications to perform the measurement.
3. The analysis should be carried out in conditions as close to real as possible, i.e., with similar lighting, taking into account the assumed time for the measurement, and at the assumed assembly/processing stage.
GRR Analysis Process
The steps resulting from the analysis can be classified as follows:
1. Operators conducting the audit should mark themselves in a way that allows identification (e.g., using their employee number).
2. If necessary, calibrate the measuring device.
3. Operator A measures 10 products, then Operator B, C, and then the series is repeated.
4. You can randomize the order of employees within a series.
5. Operators should not know their previous results.
6. Take special care to record the results to avoid mixing data.

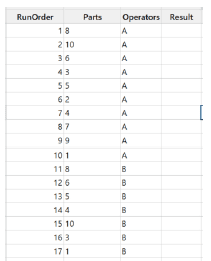
Fig. 4. The Structure of Data Presentation Using the Minitab Software
Interpretation of Gage R&R results
The basic acceptance criterion for the Gage R&R ratio is that it should be less than 10%.
GRR between 10% and 30% may be considered conditionally acceptable, after considering the severity of the characteristics (i.e., its importance), the cost of new equipment, repair, process improvement, etc. However, if the indicator exceeds 30%, the measurement system needs improvement.
In this case, it may be due to high EV (Equipment Variability), i.e., variability due to control equipment or devices. In other words, there are significant differences between measurements of the same part.
What are the most common causes that should be verified?
No repeatability of the measurement method High variability of the part itself Variation within the measuring device, e.g., free play Another reason is the high index for AV (Appraiser Variation) – that is, the variability coming from the operator. Significant differences occur between the results obtained by the operators.
The most common causes here include:
- Differences in measurement between operators
- Unclear or imprecise work instructions
- Measurements without work instructions (no standard)
As you can see, the Gage R&R allows us to perform an accurate assessment of the repeatability and reproducibility of control and measurement devices. Ultimately, this improves the quality of products and increases the efficiency of production processes.
Łukasz Matuszczak


